A Guide to Troubleshooting Common 3PAR Error Codes
3PAR Error Codes Troubleshooting Guides Page
We get it. Troubleshooting your 3PAR device can be a pain. Error messages and email alerts are coming at you and searching OEM manuals or scanning forums for help can be equally frustrating.
The goal of this troubleshooting guide is to help you diagnose a few common errors that don't require a ton of engineering expertise to repair. We understand that you are probably looking for a quick and easy solution to your 3PAR issue, but there are some situations where the expertise of an engineer can prevent a serious IT disaster.
Obviously, we can’t cover every 3PAR error code out there, but we’ve put together a few common codes and the issues that can cause them.
We have to stick a disclaimer in here that M Global can't take responsibility for the implementation of any of the advice given on this page. But if you find yourself in a bind with your 3PAR device and need help resolving your issue, give us a call! We are happy to help!
Troubleshoot 3PAR Storage System Errors with Checkhealth
About Checkhealth
Checkhealth is a handy 3PAR tool that can be used to provide an overview of the current state of the array. It checks components as well as software and the output will include hardware, software, and configuration issues. While troubleshooting based on an isolated email alert may only give you narrow view of what’s actually going on, running checkhealth can give a more complete and accurate picture of what’s going on in your array.
How to Run the Checkhealth Command
The checkhealth command is almost always run from the Command Line Interface or (CLI) and can be run a few different ways. Two beneficial flags are -svc and -detail.
1. Login to your array using SSH with your usual admin credentials.

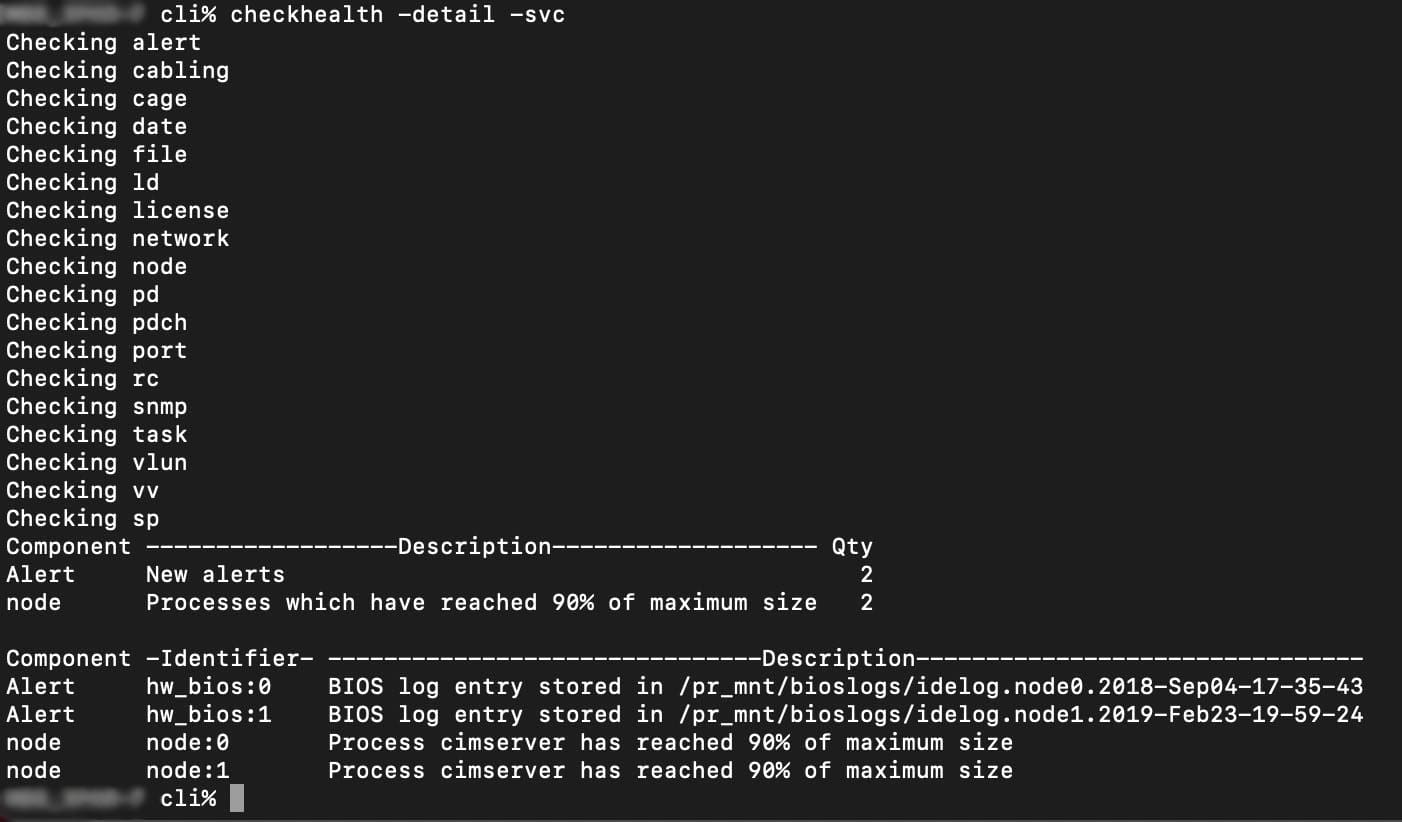
2. From the CLI run the command ‘checkhealth -detail -svc’.
The -svc and -detail flags allow us to get a more detailed output from the checkhealth command. With this information we can determine if there are any issue that require further investigation.
Below is an example of what an output may look like.
How to Determine If Your 3PAR Device Has Failed or Degraded Disks
Errors that include degraded or failed disks can be caused by various issues. Just because a degraded disk error comes up doesn’t mean that the disk has failed and needs to be replaced. It could be showing that alert because something else has an issue such as a cable on the array, a cage interface card or a node.
Diagnosing a Degraded 3PAR Disk
1. Login to your array using SSH with your usual admin credentials
2. From the CLI run ‘showed -failed -degraded’

If there are degraded disks listed, we can determine if the disk itself is failing or if a different component is causing the degradation. Because there are 40+ reasons that a disk can go degraded, it may take a little more investigation to find the root cause.
When you get a “degraded” disk error, determining if it is in fact the disk that has failed or some other issue is crucial. Sometimes when a node fails, all the disks that share that path can show as degraded. That means you could get 40+ messages of disks being degraded which can be a pretty alarming situation! If that happens to you, don’t worry, that’s a normal symptom of your node failing.

The disk in the example above was determined to not be physically missing and was able to be brought back online.

Below are a couple of reasons that a disk can go degraded.

Here is a disk that is degraded due to being missing, if the disk is still physically in the 3PAR it may be okay.

This disk is degraded due to a missing A port and could be the result of a cage or node error.
Replacing a Failed Disk
Occasionally 3PAR disks need manual intervention to allow the disk to go from a degraded state into a full failed state. A fully failed disk has already had data moved from the normal space to the spare space, as it’s called in the 3PAR world. When the 3PAR array has determined a disk has failed, it will start evacuating from used space to spare space to allow for the disk to be replaced.
The process might look something like:
- Receive the alert
- Investigate the cause
- Verify the failure
- Prepare the disk to be replaced
- Replace disk
Replacing a 3PAR Power Supply
PSU Replacement Procedure
- Check to confirm the PSU is faulted by checking for an amber status LED.
- Once the failure is confirmed, power off the PSU that was confirmed using its switch and unplug the power cable.
- Remove the faulty PSU from the array.
- Unpack the replacement PSU and check to ensure there is no damage to the component.
- Install the replacement PSU into the array.
- Plug the power cord into the PSU and switch the PSU on.
- SSH into your array and check on the PSU that was installed. Syntax will depend on which cage the PSU was replaced in.
(Example: showcage -d cage0 for a PSU installed in cage0)
3PAR Cage Loop Offline Errors
Like many other errors, the cage loop offline error can be caused by various issues including a failed cable, the port itself, the whole disk cage, or the node. Each disk shelf or cage in 3PAR lingo, has two connections, a left port (A) and a right port (B). If either port goes offline, you will get a cage loop offline error. The first important step is to determine if the node caused the cage to go offline or if it is the cage itself. A visual inspection can help with this since an amber LED on either the node or the disk cage port will show the failure point.
Cages & Ports
1. Login to your array using SSH with your usual admin credentials
2. From the CLI run ‘showcage -d’ and ‘showport’
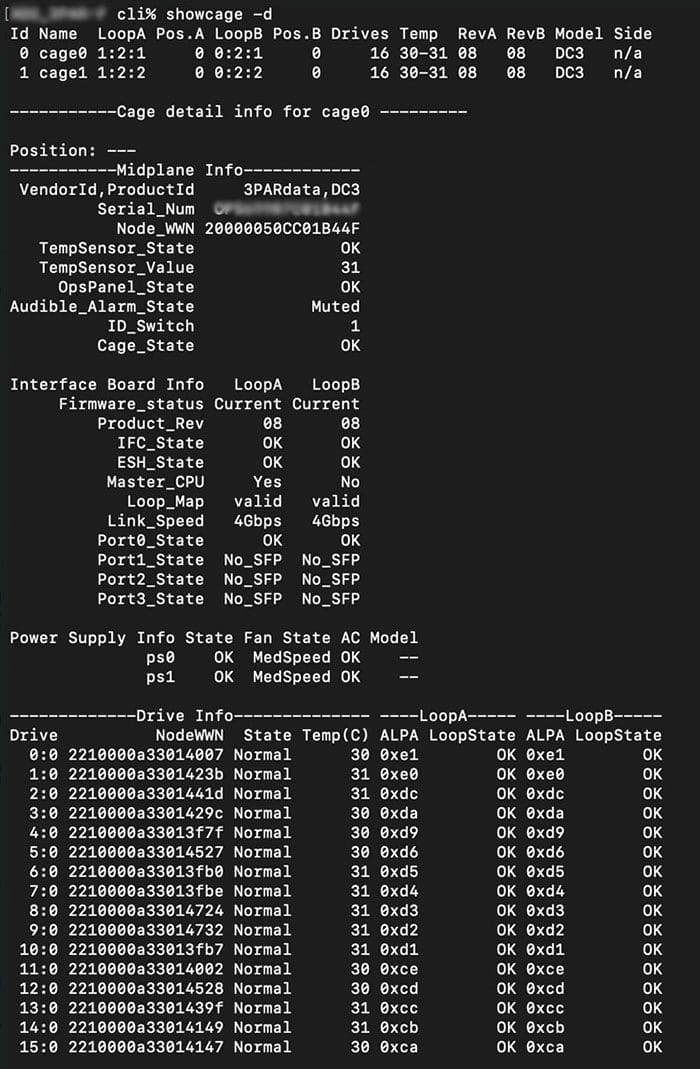
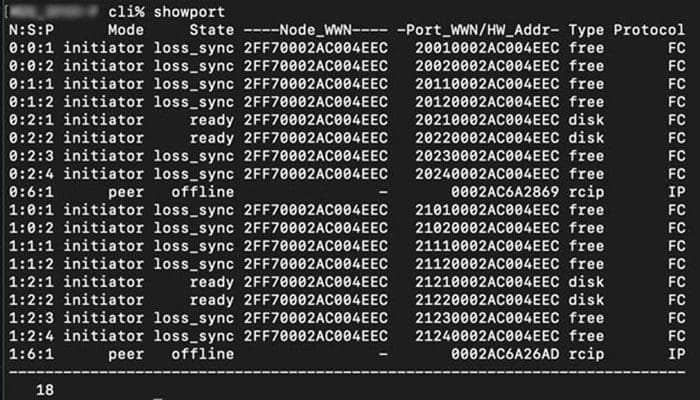
When troubleshooting port issues, it's important to determine if the issue is on the cage side or the node side. The above commands will get us started with where to look to get your cage or node ports back online.
Sometimes the port runs to a host that may not be supported by us. That's not a problem. We will identify which port on the 3PAR the host is connected to so the 3PAR can be fixed if it's causing the problem.
Below is an example showing cage ports and node ports, and the correlation between them.
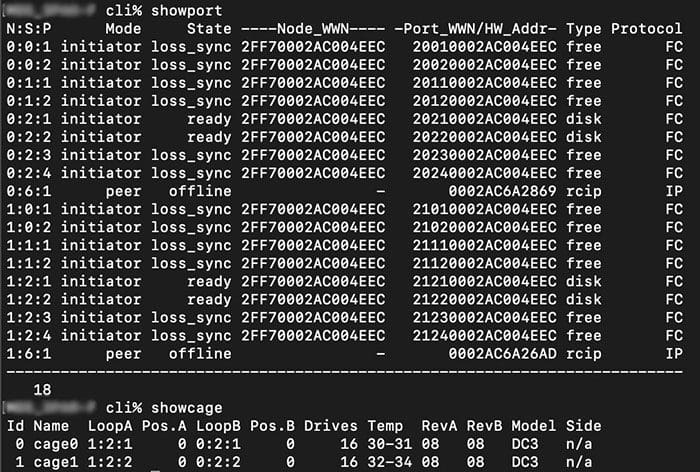
Cage0 and cage1 are plugged into ports 1:2:1, 1:2:2, 0:2:1 and 0:2:2 (these 4 ports are of type disk)
3PAR Host Port CRC Errors
3PAR CRC host port errors are external errors that come from the host connected to your 3PAR device and are extremely common. CRC errors are used to diagnose connectivity to hosts/switches or other infrastructure equipment “upstream” and are rarely a result of an issue on the 3PAR device. After investigating the host causing the CRC errors (which can be identified by the port called out in the alert), use the handy checkhealth tool we mentioned above to ensure the error is resolved.
Evaluating the Severity of 3PAR Error Code Issues
On a scale of 1 - 3, with "1" being severe and "3" being noncritical, a failed node is probably the most critical at a “1” because they require more expertise to resolve especially if parts are being sourced on the secondary market. Purchasing nodes from the secondary market requires a little extra homework to ensure that they are properly configured since otherwise they will not work properly.
A failed disk is likely to be the least critical at a “3” because they are a little more straightforward to replace. A failed disk cage falls somewhere in the middle at a “2” since it can depend on your individual array. There is the potential that it could be a serious issue, but if you absolutely needed to, you could borrow parts from another disk shelf to get it back up in an emergency.
With any of these issues, we are happy to step in at any stage and help. We can even help you source parts since this can be an unforeseen minefield.
Suggested Content
Get Started Now
We want you to consider us an extension of your team, a trusted resource and advisor. Call us today at 855-304-4600 to find out more.


